Help centre
Browse our frequently asked questions to find the answers you’re looking for.
My account
Cheques and payment options
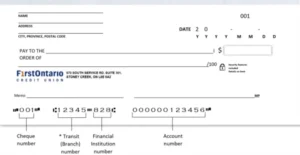
A void cheque can be used to set up a direct deposit or pre-authorized debit instructions on your account. Three sets of numbers are taken from the bottom of your cheque when the instructions are set up – the transit number, the institution number and your account number. If you don’t have cheques, call our Member Service Centre at 1-866-800-2787 to request a Direct Debit/Deposit Request form.
You can log in through our mobile app, tap Scheduled and choose the payment you would like to cancel, then select Delete.
In online banking, select Payments in the menu on the left. Go to View/Modify Scheduled Payments, choose the scheduled payment you wish to cancel, then hit Delete. You will then have to Confirm to complete the update.
Visit Account Services through your online banking and select Order cheques. You can also call our Member Service Centre at 1-866-800-2787 so our staff can make the arrangements for you.
For our Business members, cheques must be ordered through our Member Service Centre.
Some members will have immediate access to a limited amount of the funds they deposit at one of our ATMs. The remaining funds will be held for a short time.
This hold period allows our credit union to verify that the funds will be available from the account at the other financial institution on which the cheque and/or other negotiable items are drawn. Member-specific circumstances will determine what they can access right away and if longer holds are required.
Holds are placed on member’s accounts to protect you and the credit union against possible losses and/or fraudulent activity. Our guidelines for the duration of holds are below.
| Cheque Drawn | Duration (in Business Days) |
|---|---|
| In Province | 5-10 |
| In Province (new member) | 7-10 |
| Out of Province | 10-20 |
| United States | 30 |
| All cheques for members who declined credit bureau authorization when membership was opened | 30 |
To avoid having a hold placed on your account, you may wish to set up direct deposit arrangements with the sender if it’s a payment you’ll be receiving regularly.
You can also arrange to receive the money by Interac e-Transfer® if the funds are coming from a Canadian financial institution in Canadian dollars. This is another option to transfer money that’s safe, easy and immediately available.
Statements
Statement preferences are controlled by the primary account holder on an account.
If you are currently receiving paper statements in the mail and they are addressed to you, you can change your preference in online banking to receive only eStatements.
If you are a joint account holder and the mailed statement is not addressed to you, you will not be able to switch that paper statement as it will need to be switched by the primary account holder.
All members are set up to automatically receive eStatements in online banking. You can stop paper statements from being mailed to you by changing your preference in online banking. Simply log in to online banking and follow these simple steps:
- In the left navigation menu, select My Accounts.
- Within the My Accounts menu items, select Statement Preferences.
- The first screen will show you your membership number.
- Select Next. On the next screen, choose E-Statements only as your statement preference and select Continue.
- The next screen will summarize your preference. Select Confirm to complete the process.
Depending on timing of completing these steps, you may still receive one more paper statement mailing after cancelling paper statements.
Your eStatement can be found by logging in to online banking and following these simple steps:
- In the left navigation menu, select My Accounts.
- Within the My Accounts menu items, select View eStatements.
- The e-Statements screen will appear, and you can select the year from which you would like to view a statement.
- After you choose the specific year, each month for which a statement is available will appear for you to select from.
- Select the month you want to open a PDF of that month’s statement.
Wire transfers
To send a wire transfer, call our Member Service Centre at 1-866-800-2787 and have the following recipient account information ready:
- Recipient name and full address
- Recipient account number or IBAN (international bank account number) (if applicable)
- Financial institution name and address
- Swift Code and/or ABA Number (routing number)
- Intermediary financial institution (if applicable)
A wire transfer takes approximately three to five business days to be processed.
The person sending the wire transfer to your Creative Arts Financial account must provide the following information to their financial institution:
- Your name (account holder) and full address
- Your account number
- Your branch transit number and full branch address
- FirstOntario Credit Union’s institution number: 828
- Applicable SWIFT code(s) and intermediary financial institution (see below for additional details)
If the account, name or address listed on the incoming wire transfer does not match exactly to your Creative Arts Financial profile, funds may be returned to the sender.
Once a wire payment has been sent from another financial institution, it takes three to five business days until Creative Arts Financial receives the funds. Timing depends on the currency sent, where the sending financial institution is geographically located, and how many intermediary banks the sending financial institution needed to use for the transfer.
In addition, you will need to provide the sender with the following information:
| Additional Details | |
|---|---|
| SWIFT BIC | CUCXCATTVAN |
| Financial Institution | Central 1 Credit Union |
| Address | 1441 Creekside Drive, Vancouver BC, V6J 4S7 Canada |
For all international wires (not including U.S.), funds will be posted in Canadian funds.
Please note there may be additional foreign exchange fees.
The person sending the wire transfer to your Creative Arts Financial account must provide the following information to their financial institution:
- Your name (account holder) and full address
- Your account number
- Your branch transit number and full branch address
- FirstOntario Credit Union’s institution number: 828
- Applicable SWIFT code(s) and intermediary financial institution (see below for additional details)
If the account, name or address listed on the incoming wire transfer does not match exactly to your Creative Arts Financial profile, funds may be returned to the sender.
Once a wire payment has been sent from another financial institution, it takes three to five business days until Creative Arts Financial receives the funds. Timing depends on the currency sent, where the sending financial institution is geographically located, and how many intermediary banks the sending financial institution needed to use for the transfer.
In addition, you will need to provide the sender with the following information:
| Additional Details | |
|---|---|
| SWIFT BIC | CUCXCATTVAN |
| Financial Institution | Central 1 Credit Union |
| Address | 1441 Creekside Drive, Vancouver BC, V6J 4S7 Canada |
Please note there may be additional foreign exchange fees.
The person sending the wire transfer to your Creative Arts Financial account must provide the following information to their financial institution:
- Your name (account holder) and full address
- Your account number
- Your branch transit number and full branch address
- FirstOntario Credit Union’s institution number: 828
- Applicable SWIFT code(s) and intermediary financial institution (see below for additional details)
If the account, name or address listed on the incoming wire transfer does not match exactly to your Creative Arts Financial profile, funds may be returned to the sender.
Once a wire payment has been sent from another financial institution, it takes three to five business days until Creative Arts Financial receives the funds. Timing depends on the currency sent, where the sending financial institution is geographically located, and how many intermediary banks the sending financial institution needed to use for the transfer.
In addition, you will need to provide the sender with the following information, including our U.S. correspondent/intermediary bank:
| Pay Direct to | |
|---|---|
| SWIFT BIC | CITIUS33XXX |
| ABA# | 021000089 |
| Financial Institution | Citibank N.A. |
| Address | New York, USA |
| Beneficiary Bank | |
|---|---|
| SWIFT BIC | CUCXCATTVAN |
| Financial Institution | Central 1 Credit Union |
| Citibank Account No. | 36371006 |
If you hold a U.S. dollar account with Creative Arts Financial, ensure you provide the correct account for the currency you wish to receive. If Creative Arts Financial receives the wire payment in a currency that is different from the currency of your deposit account listed on the wire payment, the funds will be converted to the currency of your account.
Please note there may be additional foreign exchange fees.
Personal Assisted Teller (PAT) and ATMs
Enjoy Creative Arts Financial teller services through a live video exchange. Personal Assisted Teller machines are available at Creative Arts Financial and FirstOntario Credit Union branches and can perform nearly all the same transactions as an in-branch teller. Simply tap the screen to connect with a Member Service Representative.
Update your personal information, make a deposit to your accounts, including RRSPs and TFSAs. Pay bills, make a payment to your mortgage or line of credit, withdraw multi-denominations, transfer funds and set up recurring transfers. Just to name a few!
Our PAT machines are available at the Creative Arts Financial branch and at all FirstOntario Credit Union branches. Take advantage of live teller services through real-time video technology with the bonus of extended hours.
Absolutely. You have the option of using the handset for a more private experience, or you can use the keyboard function to type in your responses. You can also plug in your own headphones if you choose.
It will not. Personal Assisted Tellers have the same access as branch tellers.
They are not replacing anyone. We have a Creative Arts Financial team dedicated to our Personal Assisted Teller services. They are local and happy to help with your transactions.
If you just want to withdraw cash, you have the option to use our ATM or tap the screen to speak with a teller who can facilitate that for you.
Yes, you can. As a member of Creative Arts Financial, you have surcharge-free access to thousands of THE EXCHANGE Network® ATMs across Canada and through the Allpoint network in the U.S. Use our ATM locator to find the closest ATM on the network whenever you need to make a quick transaction.
If you use an ATM that is not a Creative Arts Financial, FirstOntario Credit Union, THE EXCHANGE Network®, or the Allpoint network machine, you may be subject to fees from both Creative Arts Financial and the other financial institution.
Inactive accounts
All you have to do is make at least one transaction within two years. Transactions can include everyday banking activities like a withdrawal or deposit at an ATM, using your debit card to make a purchase, making a bill payment or a transfer of funds to or from the account.
Please note: accruing interest or automated regular transfers on an account are not considered to be transactions.
Creative Arts Financial will notify you in your monthly statement about an inactive or dormant account.
Canadian financial institutions, including credit unions, are legally required to send written notification to account holders about inactive or dormant accounts. Creative Arts Financial notifies our members after two years of account inactivity and again after five years. After 10 years with no transaction activity, Ontario credit unions must transfer unclaimed balances to the Minister of Finance.
After two years with no transactions an account will become inactive and after five years with no transactions it will become dormant, regardless of the balance.
To reactivate an inactive or dormant account, simply complete one banking transaction using the account.
Debit cards
During business hours, call our Member Service Centre at 1‑866‑800‑2787. After hours, call Everlink at 1‑888‑277‑1043, 7 days a week.
A Debit Mastercard is similar to an Interac Flash debit card in that it functions the same way for in-person point of sale and ATM transactions (Interac Flash is a payment technology that allows you to make smaller, everyday purchases simply by holding your debit card up to an Interac Flash-enabled point-of-sale terminal – no PIN required).
Where a Debit Mastercard is different is that it can transact on the Mastercard network, which supports what’s known as “card-not-present” transactions like online purchases and recurring payments, functioning just like a credit card but transacting directly from your chequing account (if you do not have a chequing account, it will draw from your savings account). For example, you can set up your Netflix account to use your Debit Mastercard to make the payments, instead of a credit card.
In general, everyone who is eligible for a Flash debit card is equally eligible for a Debit Mastercard. Parents signing on behalf of minors will need to be aware of the additional features of the card.
There are no unique transaction fees or annual fees for having a Debit Mastercard. All standard account and transaction fees apply. If a trace is required for a Debit Mastercard transaction, the fee may be higher due to increased investigation costs.
Domestic point of sale transactions will continue to work the same for the Debit Mastercard. International point of sale transactions will be made using the Mastercard network, but transactions themselves will continue to operate the same way. Note that there are additional fees for using the card outside of country.
No, the Debit Mastercard is a debit card that has the ability to transact on the Mastercard network. That means there is no associated credit limit with the card, and it will not display on your credit bureau report.
Transaction limits will continue to follow the same process as we use today for Flash cards.
No, both online and point-of-sale transactions are aggregated and must be within the daily point-of-sale limit. If you make frequent online purchases, you can request a temporary card limit increase or request a fixed, higher card limit for your card in accordance with Creative Arts Financial’s policies for limits.
While the Debit Mastercard will operate more reliably for international transactions than a Flash card, you should always bring another form of payment when you are travelling and not rely solely on any single means, as every card network internationally has gaps and limitations.
With these cards operating on the Mastercard network, they are expected to be more reliable for international transactions; however, it is entirely dependent on the network capabilities of the merchant’s point of sale provider and their ability to accept Debit Mastercard.
Some retailers will not charge an account until the item has shipped, e.g., Amazon. Where that’s the case, a hold is placed on the account in the interim until the seller clears the transaction. Once the transaction is processed, the hold will be lifted.
Most holds are lifted within three to seven days; however, international transactions may have holds of up to 30 days placed on the account. Holds will be lifted when the seller completes the transaction.
Some merchants will have additional security enabled with Mastercard to help prevent fraudulent transactions at the point of sale. When this is the case, you will be sent a one-time passcode to verify the transaction.
A one-time passcode is an authentication code sent through email or SMS during an online purchase (card-not-present), only if the merchant participates and deems the transaction to be high-risk. The one-time passcode provides an extra layer of security to validate who is attempting the online purchase. If you receive and validate a one-time passcode, the transaction will process.
If you are unable to validate the one-time passcode, the transaction will be declined. It is important that your details (i.e., name, home address, mobile number, email address) are accurately kept up to date. If your details are not accurate, online purchases may be declined and/or you may not be able to action the one-time passcode to finalize the purchase.
If you do not have an accurate email or phone number on file with Creative Arts Financial, this process cannot be completed, and it is recommended that you call our Member Service Centre at 1‑866‑800‑2787 to address the missing information and get further assistance.
A variety of reasons could contribute to a failed transaction, including:
- Failed security check: Online transactions must pass through a series of security checks, which are validated against your account. This is often caused by mismatched information entered that is validated against what is on your file.
- Card limits being reached will cause a transaction to fail.
- In some circumstances, the merchant may not accept Debit Mastercard transactions.
If you wish to have a Debit Mastercard, contact our Member Service Centre at 1‑866‑800‑2787.
If you can’t remember your PIN or if you are locked out, you can reset it at any one of our Personal Assisted Teller (PAT) machines. You will need a mobile device so you can sign the applicable form electronically. Please make sure you have at least two pieces of valid photo identification.
If you know your PIN, but you want to change it to something different, you can change it at any Creative Arts Financial, FirstOntario Credit Union or THE EXCHANGE Network ATM.
Call our Member Service Centre at 1-866-800-2787 to find out your debit card and ATM withdrawal limits. If you’re planning on making a large purchase, you can request a temporary increase to your limit.
Mobile banking
- Log in to FirstOntario’s mobile app using your current Personal Access Code (PAC).
- Navigate to Settings.
- Select Change Personal Access Code.
- Enter your current PAC followed by your new PAC. You will need to enter your new PAC a second time to confirm it.
- Select Save.
You can reset your password at any time by simply clicking Forgot Password? on the online banking login page. Online users must be enrolled in 2-Step Verification (2SV) to enable this feature. Business members need to call our Member Service Centre to reset their password.
Once you are on the log in page:
- Select Forgot Password?
- Enter your debit card and the last three numbers of your SIN.
- Hit Continue.
- You’ll receive a one-time passcode as part of 2SV, which you will then need to enter.
- Enter and confirm the new PAC.
- Hit Continue.
Download the FirstOntario mobile app for free from the App Store or Google Play.
For iPhone Users:
- Using your iPhone, search for FirstOntario in the App Store.
- Select the app icon and verify that the author of the app is FirstOntario.
- Tap the icon marked Free, then tap again when it changes to Install.
For Android Users:
- Using your Android phone, tap the search icon and search FirstOntario in Google Play™.
- Select the app icon and verify that the author of the app is FirstOntario.
- Tap the icon marked Install, then tap Accept on the next screen.
The FirstOntario mobile app is compatible with devices running iOS 15 or later and Android 10 or later.
- From the log in screen, enter your credentials and select Remember Me.
- In the Saved Login Profile field, enter a name to set up a profile.
- From the mobile app dashboard, locate and select Settings.
- From the Settings menu, select Biometric Setup.
- Select Use Biometric Login in the pop-up message.
- Enter your personal access code (PAC).
- The mobile app will prompt you to complete a successful biometric validation with fingerprint or face ID. Once this validation is completed, you are enrolled and the biometric login process will be used for your next log in.
From the dashboard, select QuickView Settings. The app will show the accounts you can display in QuickView. Select up to three accounts and press Save.
Log in to the mobile app and head to your Accounts section. Choose your line of credit (or any other account) and select Account Details.
- Log in to the FirstOntario mobile app.
- Tap Deposit.
- Enter your account and the amount of your deposit.
- Snap a photo of the front and back of your cheque.
- Tap Continue.
- Log in to the FirstOntario mobile app.
- Tap Pay Bills.
- Select your account and payee.
- Choose amount and payment date.
- Tap Pay this Bill.
- Log into the FirstOntario mobile app.
- Tap Pay Bills.
- Tap Manage Payees.
- Tap Add Payee.
- Choose payee to search, tap Done.
- Choose correct payee and add in your account number.
- Add Payee then Confirm.
- Log into the FirstOntario mobile app.
- Tap Deposit.
- Enter your account and the amount of your deposit.
- Snap a photo of the front and back of your cheque.
- Tap Continue.
- Log into the FirstOntario mobile app.
- Tap Pay Bills.
- Tap Manage Payees.
- Choose Delete Payee.
- Choose the payee you want to delete.
- Tap Delete.
- Log into the FirstOntario mobile app.
- Tap Transfers.
- Choose To My Account.
- Select the accounts, amount and Recurring.
- Tap Continue.
- Choose the frequency, tap Continue and Confirm.
Deposit Anywhere™
The deposit will appear immediately in your account activity, but will not be included in the available balance.
Only Canadian dollar cheques can be deposited, and only into accounts located in Canada.
Deposit Anywhere™ is safe and secure. This service is not a third-party app and does not require a separate download. By including it within the mobile banking app, your mobile banking transactions are protected and confidential.
Cheque images are not stored on your device. Public and free Wi-Fi connections should not be used for banking transactions; for enhanced security, we recommend that you use your carrier’s internet connection.
Please contact us to find out about your limits. There is no maximum number of cheques that can be deposited per day.
Holds are placed on member’s accounts to protect you and the credit union against possible losses and/or fraudulent activity. Our guidelines for the duration of holds are below.
| Cheque Drawn | Duration (in Business Days) |
|---|---|
| In Province | 5-10 |
| In Province (new member) | 7-10 |
| Out of Province | 10-20 |
| United States | 30 |
| All cheques for members who declined credit bureau authorization when membership was opened | 30 |
To avoid having a hold placed on your account, you may wish to set up direct deposit arrangements with the sender if it’s a payment you’ll be receiving regularly.
You can also arrange to receive the money by Interac e-Transfer® if the funds are coming from a Canadian financial institution in Canadian dollars. This is another option to transfer money that’s safe, easy and immediately available.
After depositing your cheque with Deposit Anywhere™, simply write “Deposited” across the front of the cheque with the date you deposited it and store it in a safe spot — we may need it for verification purposes.
After 120 days, you can safely dispose of the cheque by shredding it. There is no need to mail in the physical cheque.
- Log in to the FirstOntario mobile app.
- Tap Deposit.
- Enter your account and the amount of your deposit.
- Snap a photo of the front and back of your cheque.
- Tap Continue.
Online banking
To get started, you will need a Personal Access Code. If you already have a debit card, give our Member Service Centre a call at 1-866-800-2787 to get set up. Then, enjoy the convenience of 24-hour access to your accounts.
- Log in to FirstOntario’s online banking using your current Personal Access Code (PAC).
- Navigate to Profile and Preferences in the left navigation menu.
- Select Change Personal Access Code.
- Enter your current PAC followed by your new PAC. You will need to enter your new PAC a second time to confirm it.
- Select Submit.
You can reset your password at any time by simply clicking Forgot Password? on the online banking login page. Online users must be enrolled in 2-Step Verification (2SV) to enable this feature. Business members need to call our Member Service Centre at 1-866-800-2787 to reset their password.
Once you are on the log in page:
- Select Forgot Password?
- Enter your debit card and the last three numbers of your SIN.
- Hit Continue.
- You’ll receive a one-time passcode as part of 2SV, which you will then need to enter.
- Enter and confirm your new PAC.
- Hit Continue.
All members are set up to automatically receive eStatements in online banking. You can stop paper statements from being mailed to you by changing your preference in online banking. Simply log in to online banking and follow these simple steps:
- In the left navigation menu, select My Accounts.
- Within the My Accounts menu items, select Statement Preferences.
- The first screen will show you your membership number.
- Select Next. On the next screen, choose E-Statements only as your statement preference and select Continue.
- The next screen will summarize your preference. Select Confirm to complete the process.
Depending on timing of completing these steps, you may still receive one more paper statement mailing after cancelling paper statements.
Your eStatement can be found by logging in to online banking and following these simple steps:
- In the left navigation menu, select My Accounts.
- Within the My Accounts menu items, select View e-Statements.
- The e-Statements screen will appear, and you can select the year from which you would like to view a statement.
- After you choose the specific year, each month for which a statement is available will appear for you to select from.
- Select the month you want to open a PDF of that month’s statement.
- Once you log in, choose the chequing or savings account from which the form is needed. Note – this feature is not available in mobile banking.
- Below Account Details, select Direct Deposit and Pre-Authorized Debit (PAD) Form.
- A letter will automatically be generated and will include a copy of the void cheque.
- You can print the letter if a void cheque is needed or you can easily locate the institution number, transit number and account number to set up a pre-authorized credit or debit.
- Be sure to delete the download once you’re finished to ensure your banking information is protected.
Log in to online banking and head to your Accounts section. Choose your line of credit (or any other account) and select Account Details.
- From the left navigation menu, select Account Services.
- Select View Credit Cards from the menu, and you will be taken to the Add/Remove Collabria Card page.
- Select Link a Collabria Credit Card.
- Read and agree to the terms and conditions.
- Enter the 16-digit credit card number and three-digit CVV for the card you would like to link.
- Select Link Card, and you will be taken to a page confirming your newly linked accounts.
- Log into online banking.
- Select Payments then choose Pay Bills.
- Select the account you would like to pay from.
- Choose the bill payee, add in payment date and amount.
- Click Pay bills.
Good to know
Click on the Schedule Recurring Payment tab to automate your payments.
- Log into online banking.
- Click Payments.
- Choose Add/Delete Payees.
- Add Payee: enter the payee name and search.
- Choose your payee from the list and key in your account number.
- Click Submit.
- Log into online banking.
- Click Payments.
- Choose Add/Delete Payees.
- Choose the payee, then click Delete.
- Click Confirm.
- Log into online banking.
- Select Transfers in the left navigation menu.
- Select Transfer Between Accounts.
- Select the account you want to transfer from and enter the amount.
- Choose Recurring Transfer and transfer to My own account.
- Click Continue.
- Select the account you want to transfer to.
- Set the start date, frequency and end date.
- Click Continue.
- After you review the details, click Confirm.
ClickSWITCH
ClickSWITCH is a web-based application that makes it easy to quickly and securely switch online bill payments, automated payments and direct deposits from an existing financial institution to your account at Creative Arts Financial. ClickSWITCH removes the hassle of contacting all of your billers and helps ensure you don’t miss a payment when you change financial institutions.
Input your payment and direct deposit information into the secure ClickSWITCH system, and ClickSWITCH will contact your billers to switch your payments over to your Creative Arts Financial account.
Yes, you can! Call our Member Service Centre at 1-866-800-2787, and they will be happy to answer any of your questions or make an appointment to start your switch.
Gather all of your automated payments and direct deposit information. A previous account statement is a great way to identify recurring electronic payments and direct deposits that have been set up through your account.
- Gather your direct deposit and/or recurring electronic payment information (a previous statement should have everything you need).
- Log in to online banking.
- Look for the ClickSWITCH option, under Payments, on the left side of your screen.
- Select the account(s) you want to switch to and click Enroll and Sign in Now.
- Read and accept the Terms of Use.
- You’re ready to start switching!
You will need to have some details to switch the payment, as billers require certain information to confirm your identity and complete the switch. Your name, biller’s name and account number are required. For some billers, an address and phone number will populate automatically; however, if the biller is not in our database, we’ll need you to provide the biller’s address and phone number. A previous account statement should have all the details you need.
Timing varies depending on the type of payment, payee/biller and method needed to switch the payment. Online banking bill payments are switched instantly. Recurring payments and direct deposits typically take between 7-10 business days, but can be faster with certain billers. Government-related switches may take longer.
The easiest way is to look at the “Status” column of your ClickSWITCH account. Switches that have been completed and confirmed by your biller will display a “Completed” status. Switches that are still being processed will display a “Mailed” status. For switches that have a “Mailed” status for 10 days or more, we recommend contacting your biller to confirm the switch is complete, as some billers may not update the status in the ClickSWITCH system.
We recommend keeping enough money in your old account to cover each payment until the switch status is “Completed”. This is especially important for any payments that might be due during the 14 days after you initiate a switch.
Monitoring your switch status is an important part of moving your account. It is advisable to keep enough money in your old account to cover each payment until the switch status for that payment has changed to “Completed” or you’ve confirmed with your billers that your payment account information is updated in their systems. Please contact our Member Service Centre at 1-866-800-2787 if you have additional questions.
Online security
Alerts
You can set up an email and/or text alert that will notify you when an online login has occurred. Alerts can be set up in online banking by going to Messages and Alerts in the left side menu, then selecting Manage Alerts.
Once you are logged in, click on Messages and Alerts (Alerts on the mobile app) and then select Manage Alerts. You can enable different alerts to notify you when a new payee is added, when an online login has occurred, when your personal access code has been changed and when an e-Transfer contact has been added.
2-Step Verification (2SV)
2-Step Verification (2SV) is an enhanced security feature in online banking that requires a one-time verification code to log in successfully. These codes are time-sensitive and are sent by text (recommended), email or voice call – whichever you registered during enrollment.
No, you can’t. 2-Step Verification is a required security feature for all members.
Yes, you can. Using the mobile app, on the log in screen, select Remember Me. After you log in, go to Settings and select Biometric Setup.
If you would like to register for 2SV, you can do so by logging in on your desktop.
This process does not collect or keep any personally identifying information.
When you log in to online banking, you will be presented with the steps to enroll. You will need an email address, or for text messages, you’ll need a mobile phone. For voice call, you can use a mobile phone or a landline.
Choose one you can access easily – this is where you will get the verification code you need to access your accounts in online banking when you log in. Text messages are recommended.
If you have access to your previous device, you can remove it through your Profile and Preferences section in online banking. You can register your new device here too.
If you don’t have access to your previous device, please contact our Member Service Centre at 1-866-800-2787.
For business members experiencing issues, we recommend calling the customer service teams for those respective accounting software platforms.
Here are the customer service numbers for a few popular programs:
- QuickBooks: 1-833-317-2226
- ZipBooks: 1-415-964-1947
- Sage: 1-866-565-2726
- Netsuite: 1-905-890-8100
The code is valid for 10 minutes from the time it is generated. It is important to note that if you are receiving the code by email, you have to keep your online banking tab open while you retrieve it. You can access your email by opening a new tab or logging in on another device.
For voice call, once you receive the call, the code will be repeated twice. If the call is not answered, the code will be left on voice mail, but will expire within 10 minutes of it being generated.
If you did not receive a code after 10 minutes, select Didn’t receive a code? We can send you a new one.
If you still don’t receive it, first consider the following:
- Ensure your device has a strong signal (if not, try changing locations).
- Confirm that your device is connected to Wifi or a cellular network.
- Make sure Do Not Disturb and/or Airplane mode are not enabled.
- Check your junk/spam folder.
If the code should have arrived via text message:
- Make sure your cell phone plan includes text messages.
- If travelling, be sure your cell phone plan supports international texts and/or roaming.
- Contact your carrier to ask about outages or blocked messages on your device.
If the code should have arrived via voice call:
- If using voice call, check your voicemail.
If you are accessing online banking via desktop and have requested your verification code via email, you can open a new browser tab or window to access your email account. Once you get your code from your email account, go back to the original browser tab or window and enter it in.
If you are using the FirstOntario mobile app and have requested a verification code via text message, switch to your text message app while the FirstOntario app is still open. Once you have your code, go back to the FirstOntario app and enter it in.
If you are using voice call, leave the original browser tab or window open while you receive the call to get the code.
If you’ve lost your device, please contact our Member Service Centre at 1-866-800-2787.
Call our Member Service Centre at 1-866-800-2787. Our staff will confirm your identity and reset your 2-Step Verification. Then you can register again with your new mobile number or email address.
You should get the verification texts while travelling internationally if your mobile plan provides international roaming and if there is good service. Roaming charges may apply.
No. We will never ask you to send us your code by text, email or over the phone. You will be prompted when to enter it when you are banking online.
Interac e-Transfer
Interac e-Transfer is a fast, secure and convenient way to send money to anyone in Canada using online banking. The participating bank or credit union transfers the funds using established and secure banking procedures. Transfers are almost instant, but can take up to 30 minutes depending on the bank or credit union.
The sender needs your email address or mobile phone number. You’ll receive a notification by email or text when an Interac e-Transfer has been sent to you.
From your computer or smartphone, open the email or text message and follow the simple, user-friendly instructions that will direct you to your financial institution’s online banking. Once there, you can deposit the funds into the account of your choice after correctly answering the security question set by the sender.
Sending an Interac e-Transfer via online banking:
- Log in to online banking.
- Select Transfers in the menu on the left, go to Interac e-Transfer, then select Send Money.
- Set up your profile by filling out the fields as indicated.
- Click on Add New Contact. Enter the name and email address or mobile phone number of the person who you will be sending the money to. Once you have added these details, they will be stored on the Contacts list, you will not have to enter in the same information again.
- Create a security question and answer that only the sender and receiver will know. The receiver will have to enter the answer to the security question in order to access the e-Transfer. If it’s a friend, for example, the question might be: “What is the name of your dog?”. For security reasons, the message field which enables you to leave a note for your recipient, must not contain the answer to your security question.
- Select your recipient from the dropdown list on the Send via Interac e-Transfer page. Indicate the amount you’d like to send and select Continue.
- Review the details of your e-Transfer. Your account will be debited the amount you have sent once you click Confirm.
Sending an Interac e-Transfer via mobile banking:
- Log in to the mobile app.
- Select Interac e-Transfer from the main page.
- Choose the account you wish to send money from by tapping Select Account.
- Choose the recipient of your e-Transfer by tapping Select Contact.
- Select Add Contacts. Enter the name and email address or mobile telephone number of the person who you will be sending the money to. Once you have added these details, they will be stored on the Contacts list, you will not have to enter in the same information again.
- Create a security question and answer that only the sender and receiver will know. The receiver will have to enter the answer to the security question in order to access the e-Transfer. If it’s a friend, for example, the question might be: “What is the name of your dog?”. For security reasons, the message field which enables you to leave a note for your recipient, must not contain the answer to your security question.
- Indicate the amount you’d like to send and select Continue.
- Review the details of your Interac e-Transfer. Your account will be debited the amount you have sent once you select Confirm.
No, you cannot. Interac e-Transfers can only be used to transfer Canadian funds to anyone with an email and a Canadian bank account. To send funds to someone in another country, you will need to send a wire.
Our premium chequing plans come with a range of free e-Transfers. The number of free transactions depends on which plan you have. Please see below for e-Transfer transaction limits.
For personal accounts:
| Interac e-Transfers | Limit |
|---|---|
| Maximum sending limit per transaction | $3,000 |
| Maximum sending limit per day (rolling period of 24 hours) | $10,000 |
| Maximum sending limit per week (rolling period of seven days) | $10,000 |
| Maximum sending limit per month (rolling period of 30 days) | $20,000 |
| Maximum incoming limit per transaction | $25,000 |
| Minimum incoming limit per transaction | $0 |
For business accounts:
| Interac e-Transfers | Limit |
|---|---|
| Maximum sending limit per transaction | $10,000 |
| Maximum sending limit per day (rolling period of 24 hours) | $20,000 |
| Maximum sending limit per week (rolling period of seven days) | $50,000 |
| Maximum sending limit per month (rolling period of 30 days) | $100,000 |
| Maximum incoming limit per transaction | $25,000 |
| Minimum incoming limit per transaction | $0 |
If you send an Interac e-Transfer and there is a fee (some of our chequing accounts include a number of free transactions), you will be charged immediately upon sending it. If you cancel the transaction while it is pending or the recipient declines it, you will not be refunded the fee.
If you cancel a pending Request Money e-Transfer, you will not be charged the fee.
Autodeposit
Autodeposit is a feature within the Interac e-Transfer service that enables users to save time when accepting an Interac e-Transfer. It is enabled by registering your email address with Interac and allows you to receive funds directly into an assigned account without the need to select your financial institution or answer a security question.
When sending an Interac e-Transfer, the sender is made aware in online banking that you are registered for Autodeposit.
Yes. Autodeposit has the same security as is standard with the Interac e-Transfer service. Interac e-Transfer is one of the safest digital money transfer services in the world.
When you send or request money using Interac e-Transfer, the money is transferred through the established and secure banking procedures that financial institutions have used for years to settle cheques, ATM deposits and withdrawals.
Money never travels by email or text—these are simply used to notify you that money was sent or requested, as well as provide instructions to deposit.
Registering for Autodeposit via online banking:
- Log in to online banking.
- In the left-hand menu, select Transfers and choose Autodeposit.
- Fill in the Autodeposit registration form and select Register.
- You will receive a verification email to confirm your email address and Autodeposit registration. Open this email and select Confirm Registration.
Registering for Autodeposit via mobile banking:
- Log in to FirstOntario’s mobile banking app.
- From the home screen or menu select Interac e-Transfer®.
- At the top of the Send money screen, select Settings.
- On the Settings screen, select Autodeposit.
- On the Autodeposit screen, select Add Email.
- Fill out the form to set up an Autodeposit to your email address and tap Update.
- You will receive a verification email to confirm your email address and Autodeposit registration, open this email and select Confirm Registration.
If you set up your profile with both your email and mobile phone number, you will receive a notification by email or text every time you receive funds through the Autodeposit feature, letting you know money has been deposited into your account.
The notification will also include the details associated with the transfer, who it was from, and any messages from the sender.
When you send money to an individual who has registered for Autodeposit, the recipient’s name and the legal name of the individual will be displayed to ensure the funds are being sent to the correct individual.
Interac e-Transfer transactions can only be cancelled if they haven’t already been deposited. If there was a fee charged when the e-Transfer was sent, it will not be reimbursed.
To cancel an Interac e-Transfer transaction, whether the e-Transfer was sent or requested, go into your online banking/mobile banking application and locate the Pending list. If the transaction is listed on the pending list, you will have the option to cancel it.
You can change an existing Autodeposit in online banking by going to the Autodeposit screen to view all current Autodeposits. Next to an existing Autodeposit, you will see two icons — a pen and a trash can. Select the pen icon to edit an Autodeposit and the trash can icon to delete.
Request Money
Request Money is a feature within the Interac e-Transfer service that allows you to request money via online banking. Money can be requested by sending an email or text message to any individual or business in Canada. When the request is fulfilled, you will receive a notification once the funds are deposited into the selected account.
- Log in to online banking.
- In the left-hand menu, go to Transfers.
- Select Interac e-Transfer® then choose Request Money.
- Then follow the instructions to complete the form to request funds.
The number of free transactions depends on which account you have. If there is a $1.50 service fee applied to a Request Money transaction, it will be applied to the funds being deposited. For example, if you send a request for $50, when the recipient accepts the request, $48.50 will be deposited into your account.
Yes, there are limits related to the Request Money feature. These incoming limits are rolling* limits and are the same as the e-Transfer limits.
Limits on incoming e-Transfers:
| Maximum limit per transfer | $10,000 |
| Maximum transfer limit per day (rolling period of 24 hours) | $10,000 |
| Maximum transfer limit per week (rolling period of seven days) | $70,000 |
| Maximum transfer limit per month (rolling period of 30 days) | $300,000 |
*Rolling limits are calculated by the day and time the e-Transfer is sent. For example, if the first transaction is sent at 11:30 a.m., the “day” is calculated on the 24-hour rolling period, which will end at 11:29 a.m. the next day.
Yes, you can cancel a Request Money you have initiated by viewing the Pending list. To access this list, log in to online banking:
- In the left-hand menu go to Transfers.
- Select Interac e-Transfer, then choose Send Money.
- On the Send Interac e-Transfer page, select Pending to view your list of pending transfers.
- If the money request is listed here, you will have two options listed on the right: Resend Notice which allows you to trigger a notification to the recipient and Cancel which allows you to cancel the transfer. You cannot edit a pending transfer. You must cancel it and then re-create it.
If the transfer has been completed, it will not appear in the Pending list and can no longer be cancelled.
A Request Money notification is valid for 60 days from the date it is requested. However, the expiry date can be extended by another 60 days if you resend the notification to the recipient.
Yes, outstanding requests have automated reminder notifications that are sent to your contact. You also have the ability to manually re-notify the contact, as a reminder.
Once the request for money has been fulfilled, you will receive a notification that the funds are available in your account.
If you send a Request Money notification to someone whose financial institution does not have the Request Money feature implemented, that person will not be able to accept the request. They will have to decline the request. They can then follow up by sending you an e-Transfer in the amount you had requested.
Yes, you are able to opt out of receiving requests from a particular requestor, or the service completely, by selecting the opt-out option on the request notification email.
Products and services
All of our product interest rates for personal members are on our Rates page.
An overview of our fees for personal account transactions can be found on our Service fees page.
All of our product interest rates for business members are on our Rates page.
An overview of our fees for business account transactions can be found on our Service fees page.
View our current U.S. dollar exchange rate here. Call our Member Service Centre at 1-866-800-2787 to get more information on rates for more than 50 currencies and to order ahead of your planned travel dates.